This Blood Orange Olive Oil Cake recipe is light yet rich, and simple yet absolutely delicious. Made with olive oil, adorned with a mascarpone cheese filling, and topped with blood oranges, this cake is a lovely treat for spring and beyond. We’re sharing this delightful Chloe’s Kitchen recipe today on the blog. Join us as we break it down for you and include some of our favorite serveware to go alongside. Enjoy! x
Blood Orange Olive Oil Cake
For the cake:
1 1/3 cup olive oil
1 cup Greek or European plain yogurt
2 cups almond flour
2 cups gluten-free flour
4 eggs
1 1/2 cup cane sugar
2 tsp vanilla extract
1 tsp baking soda
1 tsp baking powder
Pinch of sea salt
2 Blood oranges
1/2 cup muscovado sugar or light brown sugar
Powdered sugar to dust on top
For the filling:
8 oz mascarpone cheese
1 cup heavy cream
2/3 cup powdered sugar
1 tsp vanilla extract
Pinch of sea salt
Step 1: Bake the Cake!
Preheat your oven to 350*F.
Line two 9-inch round cake pans with parchment paper cut to shape for the bottom and spray with olive oil on the sides to make it non-stick.
Slice your blood oranges as thin as you can. I like to use a sharp mandolin on the thinnest setting. The thinner the better because they will be eaten, skin and all.
Sprinkle your light brown or muscovado sugar into one of the parchment-lined cake pans. Then arrange your blood orange slices around it in a circle, overlapping slightly making them look neat and beautiful.
In the bowl of your stand mixer with the paddle attachment, whisk together the yogurt, sugar, and eggs with vanilla extract until combined. Add in your olive oil slowly while your mixer is on. Then in a large bowl, combine your flours, baking soda, baking powder, and salt and slowly add a little at a time into the stand mixer while it’s on until it’s all gone.
Divide the mixture evenly between the two cake pans, and pop them into the oven for 20-25 minutes until risen and golden brown. You can pull them out to test them with a knife. If it comes out clean, they are ready. If it doesn’t, leave the cake in for another 5 minutes until finished.
Let the cakes cool for 15-20 minutes and then turn them out onto a wire rack to finish cooling.
Step 2: Make the Filling!
While they cool, let’s work on our frosting filling! In the bowl of your stand mixer again, but this time with the whisk attachment, add in your mascarpone, heavy cream, powdered sugar and vanilla extract.
Whisk at medium speed for about 2 minutes and then add in the pinch of sea salt. Keep whisking until it thickens and when it’s ready it looks smooth and peaks will form. Don’t over whisk it. Don’t walk away from it. It goes from watery to ready in a split second, and then over whisked and grainy quickly, trust me. You’ll see when it’s done and you can test.
Step 3: Serve it up!
Now the cake is completely cool, add in the frosting on the bottom piece of the cake and smooth out to the edges.
Place the slices on top with the oranges facing up. Serve and enjoy!
SHOP THIS DINING SCENE…
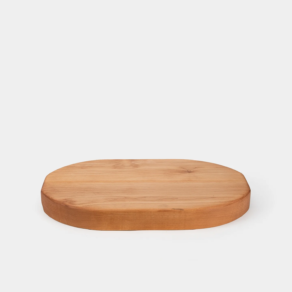
Handmade Oval Board
$140
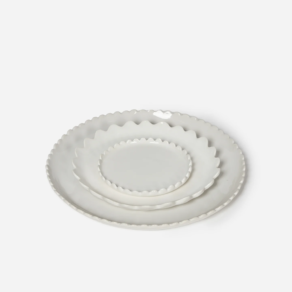
Ariel Dinnerware
From $16

Florence Cake Serving Set
$48

Solo Gold Flatware
$75

Anika Napkin
$32

